
Other interesting articles:
Fulfill a little dream for his grandson or child while doing something for the fitness and balance of the little ones. Aren’t these the basic requirements for a good gift? If you can also build such a gift together, everything is actually perfect.
The impeller is a bolted construction made of plywood panels. The 12-inch wheels are spare parts from standard "Puky" children’s bikes and were ordered from bicycle dealers. For the individual parts, which are given in the material list as raw dimensions, the outer contour must be recorded on the plywood board and cut out with a jigsaw. If there are several parts of a position, the plywood board should be large enough that several of them can be recorded on one board.
With a little patience and attention to detail you have a beautiful, cross-generational workshop project here
tool list
- jigsaw
- Cordless Screwdriver
- Table or hand-held circular saw
- To force
- rubber hammer
- sanding block
- 25 mm drill bit
- 8 mm drill bit
- 3.5 mm drill bit
- Dowel tips 8 mm
- 2 x wrenches 13 mm
- grater
- file
- hacksaw
material list
| number | description | material | thickness | length | width |
|---|---|---|---|---|---|
| 2 | page | Birch plywood | 12 | 610 | 110 |
| 2 | Fork lengthways | Birch plywood | 12 | 440 | 75 |
| 1 | Fork cover | Birch plywood | 12 | 135 | 80 |
| 1 | seatpost | Birch plywood | 18 | 220 | 120 |
| 2 | Fork across | Birch plywood | 18 | 80 | 60 |
| 2 | Frame across | Birch plywood | 18 | 30 | 65 |
| 1 | saddle | Birch plywood round bar | 18 | 310 | 15 |
| 1 | handlebars | round bar | 28 | 30 | 65 |
| 2 | Screw wheels | iron | M8 | 110 | |
| 2 | Screw seat post | iron | M8 | 85 | |
| 2 | Screw steering attachment | iron | M8 | 45 | |
| 22 | diameter washer | iron | M8 | ||
| 6 | Hutmutter | iron | M8 |
- View the best screw clamps on Amazon »
Step 1: Transfer the sign template to wood

Step 1.1
Transfer using a copying wheel (Sewing supplies) or with copy paper the outer contours of the curved parts from the drawing to the plywood.
Then saw out the individual parts using the jigsaw in conjunction with a curve saw blade. Regrind inaccurate or wavy areas in the contour.

Step 1.2
Broadcast for the individual parts that are required twice, the outer contour with the first part on plywood.
The same parts are clamped together and still once with a hand sanding block and coarse sandpaper, P80 grit, sanded on the edges.
Step 1.3

Be for the seat four equal arches made of 18 mm thick birch plywood cut out and glued together in width. When the glue has dried, you can bring the seat into its final shape with a rasp and file or an edge grinder.
Step 2: Saw out the frame from the wheel

Step 2.1
The positions of the drill holes are marked on the frame and fork parts and the positions of the steering attachment and struts of the fork are marked on the inner surfaces.
Drill into the individual parts of the frame and fork the holes for the screws (ø = 3.5 mm) and for the axles and seat mounting (ø = 8 mm).

Step 2.2
Saw the struts of the fork and that of the frame with a table or circular saw on the multifunction table. Mark the drill holes on the struts and drill the mounting holes (ø = 8 mm) for the fork.
A slot must be cut in the seat post for height adjustment. To do this, mark the slot on the board and drill a hole (ø = 8 mm) at the top and bottom.

Step 2.3
The The gap is sawed out with a jigsaw. There is a cover on the front of the fork. A decorative hole is either drilled in the middle of this cover or a cat’s eye can be attached to it. A hole (ø = 25 mm) is drilled for the handlebars at the upper ends of the fork.
3rd step: sanding and gluing

Step 3.1
Round off all edges with a hand sanding block or an edge router. Sand the surfaces with an orbital sander, final sanding grit P 180. Glue the struts of the fork to the front cover.
The individual parts for mounting the frame are ready for assembly. Specify wood glue on the connecting surfaces.

Step 3.2
First brace one side of the frame with the struts and screw the connections (Spax 3.5 x 30). The second page is clamped, aligned and screwed.
The frame is now assembled and can be set aside to dry. The two boards of the fork are connected to the struts in the same way.

Step 3.3
Three holes for wooden dowels (8 x 40) are drilled in the upper narrow surface of the seat post. Insert dowel tips into these holes, align the saddle and push it down. On the underside of the saddle you now have the impressions where you have to drill the dowel holes.
4th step: Mount saddle

Step 4.1
First glue the dowels into the seat post. Enter enough glue in the dowel holes in the saddle and on the connecting surface and clamp everything with a clamp. In order to be able to paint the individual parts better, the surfaces are painted in color or transparent before assembly.
Step 4.2

Make sure that with every screw connection, always where the machine screw meets the wood, a washer comes in between. Put the fork and frame together and push the two fastening screws through the holes. First put a washer on the screw and then unscrew the stop nut.
Step 4.3

Cut the spacers for fastening the seat post with an iron saw. Either an iron pipe or a spacer sleeve (M10 X 30) can be used as spacers. Install the seat post as shown in the drawing.
5th step: Attach wheels and handlebars
Step 5.1

Now install the front and rear wheel and tighten all screws.
You have to make sure that the wheels can turn freely.
The handlebar is generously rounded at both ends.
Then insert it through the two holes in the fork and slide it into the correct position.
Step 5.2

Mark this position with a little line on the handlebar and then move it about 12 mm.
Now enter glue all around between the fork and the marking on the handlebar and push it back.
Step 5.3
If there is too much play in the handlebar mounting hole you can also attach the handlebar from behind with a 5 mm wooden dowel through the fork.
building plan children impeller build by yourself
Courtesy of Festool
RELATED ITEMS
-
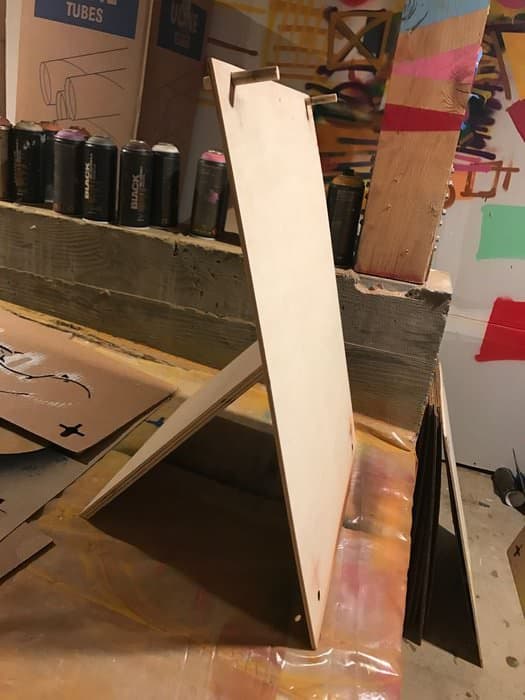
Build your own easel – 7 instructions for a diy easel
If you are an artist, you know that a high-quality easel is essential for the design of works of art. There are a number of…
-

Building instructions play house, build play house yourself, play house paradise
"Building instructions play house" is a frequently used search term when it comes to wanting to build a house for playing children in their own garden….
-
Playhouse blueprint, build yourself in the garden with building instructions
A play house blueprint makes it very easy to build your own wooden house. Many fathers or families take on this task and challenge…
-

Build musical instruments yourself: how it works
Reading time: 2 minutes Do you like making music and do you like to experiment? And you can’t afford all the musical instruments that you have…