Carving children
July 11, 2018 Comments Off on carving children
Children like to carve animals and today we have the carving instructions for you. Today the children carve a seagull, a panda bear, an owl, an elephant or a fox. You do not need chisels or expensive lime wood for that. As a material for carving with the children, we use branch or residual wood and pocket knives. A cheap fun for the outdoor kids.
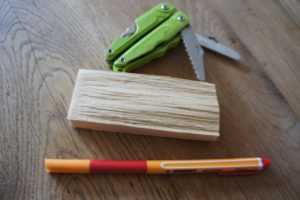
Fisch vom Kutter is a remarkable initiative in Schleswig-Holstein. There, consumers can directly buy the fish from the cutter. Fresh catch is hardly possible. On request, the fishermen also take out the fish in the harbor. Especially the seagulls are looking forward to it. They swarm around the cutter all the time and grab the delicacies in the air. An incredible spectacle that takes place behind the cutter. Partly, the seabirds wrestle each other down to forestall their competitors. We take the seagull today and carve it with the penknife. As with any animal that carves the children, we first look at photos of the seagull. To carve one with outstretched wings is a different league, so we carve a seagull that swims comfortably in the water. On material you need:
Children carve a seagull from this material.
photo (c) kinderoutdoor.de
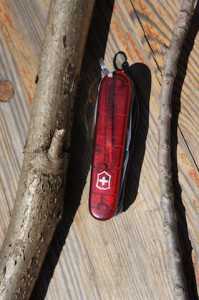
- Pocket knife or a multi tool with saw and blade
- abrasive paper
- pen
- Paint box with brush
- a piece of leftover wood (that can be wonderfully “secretly” borrowed from the containers on construction sites)
Carving children: sketch first
Take the pencil and first draw the seagull on the board. Look closely at the contours of this bird and its peculiarities in photos.

Before the children carve you sketch the seagull on the wood.
photo (c) kinderoutdoor.de
In the next step, the saw unfolds from the pocket knife or the multitool. Saw along the lines of the drawing

Use the penknife or multitool to saw the blank from the seagull.
photo (c) kinderoutdoor.de
With the big sword, we carve the seagull’s hindquarters round. When you look at the body shape of this bird, you realize how streamlined the animal is.

Use the big blade to carve the body of the seagull.
photo (c) kinderoutdoor.de
Slowly work our way forward with the penknife and carve the middle part of the seagull. Also here you round off the wood, or has anyone ever seen an edged seagull? If a seagull floats on the water, the head is visible. With the small blade you complete this.

Carve the head of the seagull around.
photo (c) kinderoutdoor.de
Use the small blade to sharpen the beak.

Give the seagull a corresponding body.
photo (c) kinderoutdoor.de
Take the seagull in your hand and look at the workpiece again and again. Keep turning the seabird and looking for edges. This will carve your round.

Finally, we sand the seagull off.
photo (c) kinderoutdoor.de
Finally, you take the sandpaper and worked with the seagull.

Paint the seagull. Fittingly with watercolors.
photo (c) kinderoutdoor.de
If you want you can paint the seabird with watercolour.
Children carve a big panda bear
Meng Meng and Jiao Qin. These are not waiters or cooks in an asian restaurant. The two are the only big pandas living in Germany. The two can be admired in Berlin Zoo. In China, this cuddly animal 大熊貓 (Peking duck sweet and sour, dish number 18) bears-cat. Where the name Panda comes from is unknown, probably from Nepal. For the big panda we need material:
- Pocket knife with saw or multitool with saw
- abrasive paper
- Paint box with brush
- pen
- Scrap wood
First you paint the bear on the wood. Saw it on the lines. Round off the edges with a penknife and work your ears off the big panda bear. Sand it off thoroughly and later paint it with water colors. Since you really only need the black. Let the bear dry and ready is the great big panda bear.
Carving with children: an owl
Everywhere the owl comes in our parlance: Let the Rumeulen. Or carry the owls to Athens, we also do not want to forget the Edmonton Eulers here. With the owls the “ears” are noticeable. Instead of carving them, we are inspired by nature. Look for a branch fork for carving. From the two side shoots, the children later carve the “ears” of the owl. Before you start, look for the material together (the list is clear)
That is really everything. Carves the two side shoots pointed to ears. Let the bark stand on the branches. Carve a notch cut around in the branch. This makes the head of the owl look better. Now comes the fine work. Scratch eyes and a beak in the bark with the small blade of the penknife. Carefully remove the remaining bark. Suddenly an owl is looking at you! Finally, round off the head of the owl a little bit. Done is this wonderful bird. At the end there is still some pointers: There are 13 species of owls in Europe and ten of them live in Germany.
Children learn to carve: A wooden elephant
Which animal lives on big foot? The elephant! We are carving a tusked animal today. I deliberately omitted the distinctive tusks. Finally, these can easily break off when carving. To make the piece a little livelier, our elephant holds the point inwards from its trunk. In order for the elephant to look authentic, it is important that the proportions are reasonably correct. You need the following material:
- A piece of leftover wood
- pen
- Multitool or pocket knife with saw
- sandpaper
In the beginning is the sketch. Draw the outline of the elephant. Then you saw off the trunk. With the big and small blade of the pocket knife or multitool you carve the body of the elephant around. Please pay attention to the transitions from the belly to the legs or from the trunk to the head. At the end, sand the elephant smooth with sandpaper. Finished is the self-carved elephant.
Fox you stole the goose! But before it’s time for the fox to go on a foray, we should carve it. It is an art when you carve the figures in motion. Therefore, we do not carve a sitting fox with the children, but one who is in the run. Before we start, the path leads us into the forest. Maybe we’ll see a fox ?! A short list for the necessary material we have:
- Branch wood alternatively a piece of leftover wood
- Multitool or pocket knife with saw and blade
- Water-mill with brush
- sandpaper
In the beginning we split the wood into three parts. Take the third of the middle of the branch. Sketch a running fox on the wood with the pen. Fold out the awl. This is the stinging thorn on the back of the pocketknife. Caves the gap between the legs. With the saw you now cut the rest of the body from the fox. Carve the head of the fox with the small blade of the pocket knife. The very skilful also carves the ears of this forest animal. With the big blade you work out the bushy tail of the fox. Finally, you sand the body off the fox with the sandpaper. But the good is still in desperate need of color. Take the paint box and with watercolors the fox gets its distinctive red tone. Let the whole thing dry a bit and the kids can be proud of the self-carved fox.
Important note in own thing: For this article, the links contained therein as well as the photos and films made by us we receive k e i n Money, benefits in kind, commission or other benefits.
Related Posts
-
Children carve a wild boar with their penknife, outdoor, outdoor experiences with the whole family
Children use the penknife to carve a wild boar 26. July 2015 Comments Off on Kids carving a wild boar with a pocket knife Children carve at every…
-

Children spend most of their time outdoors says the founder of Isbjörn of Sweden October 29, 2012 0 Comments Well-informed parents know Isbjörn of…
-

Outdoor tent Bergans Wiglo LT4 in the test: Exciting! June 16, 2019 Comments Off on outdoor tent Bergans Wiglo LT4 tested: Exciting! The Bergans Wiglo…
-
Slacklining, outdoor, outdoor experiences with the whole family
slacklining July 23, 2011 0 Comments Sun, ice, bathing and slacklines. With these four ingredients, summer is perfect for kids and teens. For the trend…