Christmas gifts tinker with children – 12 creative ideas
Would your children like to give Christmas presents? Here we show you 12 creative ideas that you can make together with your children. No matter whether grandparents, the teacher or the best friend – everyone will appreciate the gifts they have made themselves.
Creative leisure activities with children: crafting Christmas gifts
Lovingly crafted gifts are always the greatest joy at Christmas. In this tutorial, we present 12 creative ideas that you can easily implement with children. How to make individually designed gifts with your children – either for the grandparents, the uncle, the aunt or the best friend.
There are still a few weeks until Christmas is finally here, but in Advent we are more likely to pack gifts and bake cookies, so I would like to start tinkering a little earlier. Some of the raw materials (such as pine cones) can also be collected in the fall and the children have a lot of fun making pre-Christmas crafts. In addition, it promises much less time pressure and, incidentally, autumn and Christmas decorations (also for window and door decorations) can be made.
Difficulty level 1-5 / 5
(variable depending on the motif and number)
Material costs 2/5
(variable depending on the base material)
Time expenditure 1-5 / 5
(variable depending on the choice of motif and quantity)
Tip: Think about what you would like to make in advance and get all the materials. You will certainly have a lot of it in the house, you can collect some in nature and this or that has to be bought in. Stay open and flexible – the best results often result when you use materials other than the ones suggested.
Tinker Christmas presents with children
Pottery gift tags

Absolutely customizable and versatile: self-made gift tags. For this you need clay or polymer clay, possibly acrylic paints and a brush and, if desired, lacquer spray. You can find very simple instructions in our article “Pottery with Children”. To do this, simply label your finished gift tags with a permanent marker (you can then paint them – or not) and attach them to the parcel using a gift ribbon.
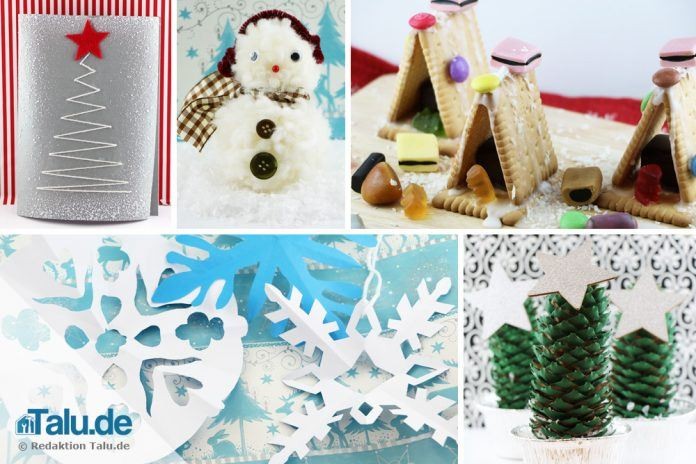
Mini fir trees in a potty
For the small fir trees you need pine cones (these can also be small and crooked – that has character), small flower pots (or thimbles or other suitable material), silver paint or silver marker or silver spray, green paint or green spray, a star for the tip and everything else you like, such as small colorful balls or glitter. A hot glue gun is best for joining, but it certainly works with super glue. Color the pine cone green. After drying, silver or white accents can be added (to indicate snow or simply to make your tree shine).

In parallel, you dye your potty silver. When everything has dried well, attach the peg in the potty. Decorate your tree according to your wishes.

Pom pom snowmen
For this you need white wool, colorful pipe cleaners (these small plush wires) and very small wooden beads in black and orange (or snippets of paper in these colors) as well as two very thin branches for the arms and some gift ribbon for or colored paper for the scarf (for you can, for example, simply braid the scarf with a few threads of wool into a braid). For the two pompoms you also need some sturdy cardboard (it should be enough for 4 circles). Make two different sized pompoms (one for the head and one for the body of your snowman) and tie the threads together so that they are close together. Cut back the protruding thread ends so that they are no longer visible.
You can find detailed instructions for making pompoms here: https://www.talu.de/bommel-selber-machen/

Decorate your snowman with eyes, nose, scarf, hat or ear warmers and buttons (or diamonds or similar) on your stomach. Glue on the arms – and you’re done!

Sock Snowman
Your kids will love these cute and cozy snowmen. All you need is a large white sock, 250 g of rice, cords and a little decoration material. First cut off the sock at the opening, otherwise the snowman will be too long. Then fill the rice into the sock. The opening is then tied with a piece of cord. Then divide the filled sock with another piece of cord into a smaller half for the head and a larger half for the body.


Now the snowman only needs to be decorated with a hat, scarf, eyes, nose and buttons. A pipe cleaner or a piece of wool are perfect as a scarf. The rolled-up sock can become a hat and loose eyes are glued on in a flash.
Handprint on Christmas tree balls

You need Christmas tree balls of your choice, acrylic paint in white, black and orange. Brush your child’s hand with acrylic paint and then place a bauble on it. Let the impression dry well. You already have an individual Christmas tree ball that you can give away to relatives or of course you can keep yourself.
Balls of yarn

For these beautiful decorative balls you need a bowl with paste, yarn and not a small balloon that you inflate in the right size. Soak the yarn in the paste. (Depending on the intended use, leave a few cm out of the bowl – if you want to make a suspension for the ball, for example). Then hold one end of the thread with the balloon knot in one hand and use the other hand to wrap the thread crisscross the balloon. Let it dry overnight, then prick the balloon and your ball is done.

Paper Snowflakes

These great snowflakes can be easily made with some white paper and scissors. The silhouette is simple and still allows you to make beautiful snowflakes as a pendant.
Butterkekshäuschen
You need 3 pieces of shortbread biscuits, a square chocolate candy (for example, Storck Riesen), two gummy bears, eight smarties, a peppermint drop with colored sprinkles and a little snow as "grout putty" (snow is stiff egg whites with sugar). Alternatively, create an icing from powdered sugar and lemon juice. A butter biscuit serves as the basis.

In the middle, attach the square chocolate candy with your "putty". The roof is made from the other two cookies. Now it is still decorated and the first house is finished. How many can there be??
Christmas glasses
For this project you need mason jars, paint or spray paint. Create creative Christmas patterns with stickers, tape or even cords. Attach your stencils to the glass – stickers stick by themselves and wool can be wrapped tightly around them – then spray the glass with varnish or brush it with paint. Once these have dried, the stencils can be removed. Now add Christmas decorations and the lantern glass is ready.

You can also use the closable glasses differently. As a special extra, print out a simple recipe, form it into a roll and then attach it to the glass with a gift ribbon. Fill the required DRY ingredients in layers in the glass. Cupcake or brownie recipes are particularly suitable for this. Write in the recipe information which ingredients are still missing and how everything can be processed. Baked cookies can also be filled in and a fairy tale can be added to the corresponding motif.

Biscuit Snowmen
For this you need three pepper nuts (or homemade white macarons), a shortbread biscuit, a chocolate wreath with sugar pearls and a square chocolate confectionery for each snowman. In addition, a small chocolate pearl, a little sugar, lemon juice and chocolate coating. Create an icing from the lemon juice and the sugar, which you use as "putty". Layer the cookies accordingly and decorate everything as you wish.
Christmas wood pictures
For these beautiful winter landscapes you need wooden frames of the desired size, some branches that you can collect during the autumn walk, some yarn and small wooden animals and other wooden decorative elements (for example stars). If you are familiar with the fretsaw, you can of course make the latter yourself. You also need an adhesive of your choice. Decorate the frames according to your wishes and attach the yarn as a suspension. You can choose to make your winter scenes colorful.
Christmas Cards
Here, too, you can of course experiment with hand and footprints, which you then decorate for Christmas. One idea that I particularly like, however, because I have only recently discovered it in the form itself, is to “embroider” a card. Woolen needles that do not have pointed tips are best suited for this. You pre-paint the motif and your children can embroider without danger.
To do this, fold construction paper of your desired color into a card. On the front and, if necessary, also on the inside, now schematically draw your motif, in our case a large triangle, which should represent a tree. Then use a needle to drill small holes along the side lines and at the top at regular intervals, through which you can thread colorful yarns and knot well on the back.

The pencil lines are then simply erased. Finally, you can write Christmas sayings or congratulations on it with colorful or metallic-colored gel pens. Snow spray always looks great too!
Related Posts
-

15 Simple diy craft ideas for christmas crafts with children
15 simple DIY crafts > 15 simple DIY craft ideas for Christmas crafts with children How happy we baked cookies with mom during Advent, painted…
-

Merry christmas poems 2019 for children, kindergarten, elementary school
Merry Christmas poems 2019 for children, kindergarten, elementary school When Merry Christmas comes, everyone is talking about joy. The positivity and…
-

The best christmas greetings for children in advent
Christmas greetings for children The beautiful Christmas season delights all hearts, allows love and harmony to return at home and gives us the…
-

The 5 most beautiful christmas games for children with scents, buttons – fantasy
The 5 most beautiful Christmas games for children with scents, keys fantasy Christmas is a feast for all the senses! These 5 Christmas games for children…