Children always try to learn Something new every day, and they always have a lot of questions.
Some phenomena can be explained to them, but you can show visually, how this or that works, this or that phenomenon.
Children learn in these experiments not only something new but also learn create differently craft, with which they can continue to play.
1. Experiments for children: lemon volcano
– 2 lemons (per volcano)
– Food colors or water colors
– Wooden stick or spoon (if desired)
1. Cut the bottom of the lemon so that it can be placed on a flat surface.
2. On the back, cut a slice of lemon as shown in the picture.
* You can cut a lemon bottom and form an open volcano.
3. Take the second lemon, cut it in half and squeeze the juice out of the cup. It will be a reserve lemon juice.
4. Place the first lemon (with the cut part) on the tray and spoon "notice" The lemon to squeeze out a little juice. It is important that the juice was in the lemon.
5. Add the food coloring or watercolor inside the lemon, but don’t stir.
6.. Pour in a lemon dish soap.
7.. Add a lemon full spoon of baking soda. The reaction will start. With a stick or a spoon you can stir everything in the lemon – the volcano begins to foam.
8th.. To make the reaction last longer, you can gradually add more soda, coloring, soap and lemon juice.
2. Home trials for children: electric eels from chewing worms
– 4-6 chewing worms
– 3 tablespoons of baking soda
– 1/2 tablespoon of vinegar
– Scissors, kitchen knives or stationery knives.
1. Scissors or a knife (it’s with – it won’t be easy, but be patient) of each worm for 4 (or more) pieces.
* The smaller the piece, the better.
* If the scissors don’t want to cut properly, try rinsing them with soap and water.
2. Mix the water and baking soda in a glass.
3. Add slices of worms to the solution of water and soda and stir.
4. Leave the worms in the solution for 10-15 minutes.
5. Use a fork to move the worms onto a small plate.
6.. Pour the bottom of a tablespoon of vinegar into an empty glass and start again to put worms in it.
See also: 10 cute handicrafts for children and adults
* The experiment can be repeated if the worms are rinsed with clear water. After several attempts, your worms will begin to dissolve, and then you’ll need to cut a new batch.
3. Experiments and experiments: A rainbow on paper or as light is reflected on a flat surface
– a bowl of water
– small pieces of black paper.
1. Add 1-2 drops of clear nail polish to the bowl of water. See how the paint spreads on the water.
2. Quickly (after 10 seconds) dip a piece of black paper in a bowl. Remove it and let it dry on a paper towel.
3. After the paper has dried (this happens quickly), start spinning the paper and look at the rainbow that appears on it.
* To see the rainbow better on paper, look at it under the sun’s rays.
Also read: Children’s craft for kindergarten
4. Experiments at home: rain cloud in the bank
When small drops of water collect in the cloud, they become heavier and heavier. As a result, they will reach such a weight that they can no longer stay in the air and start falling on the ground – this is how it rains.
This phenomenon can be demonstrated to children using simple materials.
1. Fill the can with water.
2. Apply a shaving cream – that’s a cloud.
3. Let the child start putting the food coloring on the "cloud" to drip until the "rain" starts – the drops of paint will start falling on the bottom of the cans.
Explain this phenomenon to the child during the experiment.
5. Interesting experiences: salute in the bank
1. Fill the glass with 3/4 warm water.
2. Take a bowl and stir in 3-4 tablespoons of butter and a few drops of food coloring. In this example, 1 drop of each of their 4 dyes was used – red, yellow, blue and green.
3. Stir in the dyes and oil with a fork.
4. Carefully pour the mixture into a glass of warm water.
5. See what happens – the food coloring slowly begins to fall through the oil into the water, whereupon every drop dissolves and mixes with other drops.
Also read: 10 interesting activities that will pull the kids away from the computer
* Food coloring is soluble in water but not in oil because the density of the oil is less than water (it "floats" so on the water). A drop of dye is heavier than oil, so it starts diving until it reaches the water, where it begins to dissolve and resembles a little firework.
6. Interesting experiences: in Olchok, in which the colors merge
– Print out the wheel (or you can cut out your wheel and paint all the colors of the rainbow on it)
– Screw or screwdriver (to make holes in the paper wheel).
1. Select and print the two templates you want to use.
2. Take a piece of cardboard and use a glue stick to stick a template onto the cardboard.
3. Cut a glued circle out of cardboard.
4. Glue the second template onto the back of the cardboard circle.
5. Use a skewer or screwdriver to make two holes in a circle.
6.. Push the thread through the holes and tie the ends in the knot.
Now you can twist your top and watch how colors merge in circles.
7. Experiences for children at home: jellyfish in a glass
– small transparent plastic bag
1. Place the plastic bag on a flat surface and smooth it..
2. Cut off the bottom and treat the package.
3. Cut the bag along the right and left sides so that you get two layers of polyethylene. You need a sheet.
4. Find the center of the polyethylene film and fold it like a ball to form the head of a jellyfish. Tie a string around it "neck" the jellyfish, but not too tight – you have to leave a small hole to pour water through the jellyfish.
5. The head is, now go to the tentacles. Make cuts in the sheet – from the bottom up. You need about 8-10 tentacles.
6.. Each tentacle cut another 3-4 smaller pieces.
7.. Pour some water into the jellyfish’s head and leave room for air so the jellyfish is in the bottle "swim" can.
8th.. Fill the bottle with water and push your jellyfish into it.
9.. Drop a few drops of blue or green food coloring.
* Close the lid tightly so that no water escapes..
* Let the kids spin the bottle and watch the jellyfish swim in it.
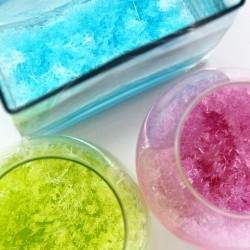
8. Chemical experiments: magic crystals in a glass
– 1 cup of epsom salt (magnesium sulfate) – used in bath salt
– 1 cup of hot water
1. Pour the epsom salt into a bowl and add hot water. You can put a few drops of food coloring in the bowl.
2. Stir the contents of the bowl for 1-2 minutes. Most salt granules should dissolve.
3. Pour the solution into a glass or jar and put it in the freezer for 10-15 minutes. Don’t worry, the solution is not so hot that the glass breaks.
4. After the freezer, place the solution in the main compartment of the refrigerator, preferably on the top shelf, and leave it overnight.
The growth of crystals will only be noticeable after a few hours, but it is better to wait for the night.
This is what the crystals look like the next day. Remember that the crystals are very fragile. If you touch them, they will most likely break or crumble immediately.
RELATED ITEMS
-

25 Natural home remedies for gingivitis in toddlers adults
Gingivitis is defined as an inflammation of the gums that is usually caused by bacterial infections. If you left it untreated…
-

Snoring in children – not only adults are affected
Studies show that about every 10th child snores. There can be several reasons for this. It is often because enlarged tonsils (tonsils)…
-

Experiments, christmas, narrotibi
I would like to encourage you to do science yourself and to do some nice and amazing experiments at home with your family….
-

Guide to festive clothing – for children and adults – lifestyle and fashion news
It doesn’t always have to be the classic evening dress > Festive attire, depending on the occasion. Pending a visit to the theater or an invitation to…