This is a nice experiment that combines color properties with water properties. This can be easily installed at home – and in kindergarten – when children are painting with watercolors anyway.
It is required:
- blue and red water colors
- 1 brush
- 2 >
1. Experiment variant:
The water is colored in both glasses with a brush: a glass with red water color and a glass with blue water color. The experiment works best if you do not save with water color.
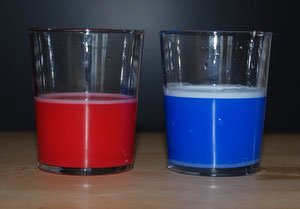
Now the red water is dripped into the blue water with the pipette. It takes a while. The color of the originally blue water changes. Gradually the blue water turns into violet water.
2. Experiment variant:
The experiment is basically carried out exactly as in the first part. The only exception: a little teaspoon of salt is stirred into the blue water.
If the red water is slowly and carefully dripped into the blue water, it looks exactly the same in the glass as in the picture: 3 different layers – blue / violet / red (from top to bottom).
These layers do not appear in the first experiment. If we really manage to carefully drip the red water into the blue water, then the red water will lie on top of the blue water. Only where blue and red water meet directly do they mix. However, the red portion continues to increase towards the top.
The more red water gets into the blue water, the more the pure blue water disappears. The red / violet water presses from above.
But if the red water is simply poured into the blue water, there is little or no layer formation. Red and blue water mix almost instantly because the red water has so much momentum that it penetrates right down to the bottom.
At the latest when you stir with the teaspoon, all visible layers have disappeared. What remains is pure purple salt water.

With me a little blue layer remained below. At the latest when the teaspoon is stirred, it will also have disappeared.
Explanation:
Salt dissolves in water and increases its density. This happens because many small salt particles are hidden in the spaces between the water particles. The density of salt water is therefore higher than the density of tap water. Liquids with a lower density float at the top. This is how it can be explained that oil floats on water. Only oil may not mix with water. Salt water and tap water, however, like to mix. The result is slightly less salty, violet water.
For the color theory this means: "blue + red = violet / purple"
Get the green out of the leaves


If you can paint with green leaves, you must also be able to color water with them. Sounds logical, doesn’t it?!
But it’s not that simple. When children pick leaves and pour cold water over them, nothing happens at first. Even with intensive stirring, the water in no way turns green. At most overnight, the water takes on a light greenish color (something between green and yellow). I had my children try it out in the same way beforehand.
If the children a little bit of help, they can make the green dye, chlorophyll, at least partially go into the water.
What do we need:
Leaves, some sand, mortar, warm / hot water from the Pipe, filter paper, funnel, small glass
How does it work:
The leaves are plucked into small – really small – pieces and placed in the mortar bowl. Now a little (!) Sand and warm water are added. The leaves are pounded with a mortar.
Afterwards it is recommended to filter the green mixture. For this purpose, a funnel is lined with filter paper and placed in a small glass with water. Now the liquid is poured into it.
Observation:
It doesn’t take long for the water to turn green. The leaves also remain green. After filtering, the children have a green solution without leaves.
Explanation:
The chlorophyll is enclosed in the plant (in the cells). These many cells have to be broken open so that the chlorophyll can leave the leaf. With the crushing and subsequent crushing with the help of sand, the children make it small Breaking up part of the cells. Then green dye gets into the water. However, since only a small part is broken open, the leaves in no way lose their green color.
Background information:
- This is an experiment in the children’s sense! You can do it independently and best of all outdoors. If you give them pipettes (or syringes), they can dilute the green solution or try other things.
- Leaves not only have green tones, but also yellow, orange and / or red tones that are responsible for the autumn colors. In spring and summer, however, chlorophyll covers the other shades of most plants.
- By the way, coffee filters are very fascinating for children. Why does the water run through the filter paper? My son took a close look at the filter and discovered tiny holes.
- Tea preparation is a nice everyday example of the transition from color from leaves to water – even if the leaves are usually dried here.
Related articles
Mix green and "segregate"
What is green made of? You can make / mix green paint yourself?
I asked my boys these questions after the painting session with green leaves.
The younger knew very well that you can mix green from yellow and blue. I gave him water colors and a glass filled with water. With the damp brush, he first colored the water blue, then added yellow color.


So it’s true: yellow + blue = green.
To prove this, there is another very nice experiment. I like to call it "Mix colors". It’s actually called chromatography. I don’t describe exactly how the experiment works, because it was made by kids & Science presented here very nicely.
We have now tried it with a green felt pen. It works wonderfully. The further the water progresses in the filter paper, the more clearly the colors yellow and blue become visible.


In this chromatography my children found it remarkable that the water climbs up, because the water in the glass does not of course reach the edge, but the water still overcomes this obstacle. It is difficult to explain why. The water does not climb either, it is pulled up. Narrow and small cavities in the filter paper suck the water upwards (so-called capillary forces). It also works wonderfully with paper handkerchiefs, which of course was immediately tried.
natural color "green"
It’s nice to see how green nature has become. And in the next few weeks it will be even greener. Green stands for the growth of plants and thus for spring.
My children are now constantly outside and come back with pants like this:
So the green plants color – at least when they slide wildly on them. My children and I wondered if we could also paint with green leaves.
So one of my sons quickly collected leaves.


He tried it out like a little researcher. I had to help a bit, because leaves are only suitable for painting when the leaves are folded and pressed firmly with the fingernail.
RELATED ITEMS
-

Hand boiler The warmth of the body causes the air in the hand boiler to expand. When the air expands, it forces the liquid to flow through…
-

Painting children’s room – which colors are suitable
When choosing the wall color for the children’s room, your child should be the focus. However, this does not mean that the favorite color is automatically the…
-
You no longer have to put your baby on your lap and risk that in addition to the bib, all of your clothing, the table, the chair and the…
-
46 Inspiration for project colors kindergarten ideas
They want to remodel their home, we now have several inspiring ideas for designing project colors kindergarten ideas for you. If you…